| |
Having made my Modular Terrain, I now needed some buildings to go on
it. After all, a ash-waste/city and muddy flats still look like a Billiards
Table if they don't have scenery on them. My first scenery tutorial will
explain how I built my Industrial Chemical Complex.
Materials
Equipment
 |
Craft knife or Stanley Knife or Scissors (whichever
is easiest for the task)
|
|
Paintbrush (if you are using liquid paints)
|
Method
-
Set out your work area, covering it with newspaper to
catch spillages and some MDF, thick card or a cutting mat to cut on
to protect the surface underneath.
-
Collect together all of your materials (always best
to be prepared and not have to wander off looking for something part
way through)
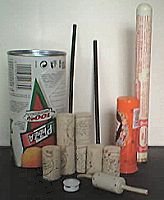 |
The materials I used for my Industrial Complex (from left to
right):
The bottom of a Pringles Tub (remember to empty it first!),
Wine Corks (available from Brewing shops quite cheaply), Bendy
Straws (picked up from a cafe where they gave you a can of Cola,
a glass and a straw that you never use), a White Thing
found in my bits box, a Round Thing from a piece of computer
cable (make sure that the cable is not going to be used before
you remove bits from it!), a Mini M&M's tub and a
Hydrometer tube (Hydrometers are expensive, but the rounded
end to the tube looked different, and the hydrometer was getting
thrown out so I took the tube)
|
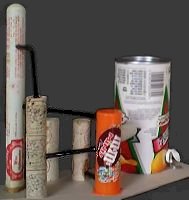
- Lay out your various tubes and pipes on the boase board, drawing around
them so that you know where they sit, not forgetting to work out where
the pipes will go.
- When you are happy with the positioning, glue the tubes in place.
You will have to cut holes out of the side of the tubes to fit the straws
in to connect the tubes. It makes it look more realistic than trying
to cut the straw to bend around the tube. If you are using corks, you
can glue a few together to get different heights of tower.
- Add any extra details that you found in your bits-box. As you can
see below, I used the White Thing as an outlet for chemicals
(complete with pool of chemical made from glue) and the Round Thing
as a different connector between the main Pringles 'vat' and
the Mini M&M's 'vat'.
- To add realism to the bigger vats, add some strips of thin card around
the top and at equal distances running down the sides. This makes it
look like the large vats have been built from several large pieces and
riveted together with metal plates covering them.
- Undercoat the piece completely black to give the Silver a good base.
- Paint the 'vats' in Silver (A failry dark silver, along the lines
of Boltgun Metal)
- Add extra details to the vats with paint. Ideas include stencilled
identification numbers down the side of the vats, chemical leaks, rusted
areas or anything else that you can think of. Don't forget to paint
your added details from your Bits Box.
- Finally, paint up the base of the model. I left my base black to fit
with the black City/ash-waste areas of the board. Alternatively, you
could paint the base up green with brown areas of dead grass around
the base of the vats, if it fits in with your boards.
Problems
|
The model has lots of bits that are difficult to get
to with a paintbrush (due to the number of pipes etc) so be careful
if you are painting the model with a brush.
|
|
Watch yourself with the knives. Games Workshop
warn you to be careful, so I might as well warn you too!
|
Back to the Top
Back to 40K home
This page is © IBBoard
Some names, pictures etc on this site are trademarks of Games
Workshop Limited. Used without permission. No challenge to their status
is intended. All pictures and artwork taken from Games Workshop's products
and used on this site can be thought of as ©Copyright Games Workshop Limited
2002. For a fuller list of Trade Marks, go here.
This website is completely unofficial and in no way endorsed
by Games Workshop
Limited
|
|